Screen comparison
In this post I am going to be briefly reviewing a variety of screen types for my thermostat and deciding upon which will fit the bill for the Ethernet model I am building.
The three screens I have in my collection are:
1.) 2.8″ TFT Touch Shield for Arduino – 2.8″
2.) Adafruit 1.8″ 18-bit Color TFT Shield w/microSD and Joystick
3.) 16×2 LCD screen
You can see the three screens side by side below:
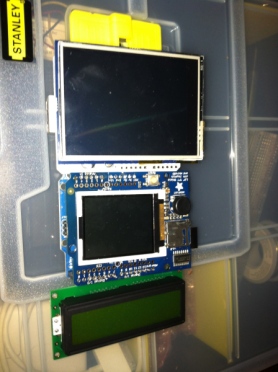
Comparison of screen types
Lets start by looking at the 2.8″ TFT touch screen.
2.8″ TFT touch screen
This device is an Arduino shield and a very nice one at that. It plugs straight into the top of your board ( I have been using an Uno) and there are some libraries available from the Adafruit site to start testig it out.
The screen is large and easy to use which is nice, and the picture quality is good. Being touch screen it also has the benefit that I wouldn’t need to use buttons on my thermostat as manual override/control could be performed directly on the screen.
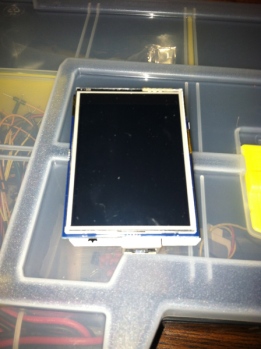
Touch screen shield
The down side to the shield though is that it is very greedy when it comes to pin use.
I tried wiring up my all in one thermistor/resistor unit to the Arduino, plugged in my Ethernet shield with the screen and hit some problems. When the shield initializes it uses some of the pins that the Ethernet shield uses, and vice versa.
At this point I hadn’t tried to hook up any relays which I will also need to switch the mains power on and off to the baseboard heater. The screen may work with some modifications but considering I have other options I will hang on to it for now and use it in another part of the system.
I suspect this shield will be better placed on a wireless thermostat device that uses a Xbee radio for communication, although I will have to do some more experimentation here.
So all in all it is a great shield but isn’t right for the particular style of thermostat I am building at the moment.
1.8″ TFT shield
The next option was the TFT shield that comes complete with a miniature joystick and SD card reader.
This is a neat little device that requires minimal soldering (just some headers) and then acts as an Arduino shield. It has a nice screen and the added bonus of an SD card slot for loading up images to the device. The Arduino pins can be accessed along the top of the board so unused pins can still be used.

1.8″ screen
I like this shield a lot, although I have some concerns about whether the joystick-button combo is right for the thermostat. Ideally I would like a few buttons that are always visible. With the previous TFT shield I could literally draw the buttons out and display them at the base of the screen at all times.
With this device, whilst this is possible, to navigate between the options would require using the joystick which may be awkward depending on the angle of the thermostat on the wall. I also feel as if the SD card slot would be wasted on this project as the thermostat has no use for it.
Having done some experimentation with it I decided against using this device for this particular thermostat and will hold onto to it until I can find a project that requires a screen + SD card reader.
16×2 LCD screen
My final option is the LCD screen. This certainly doesn’t have the polish that using one of the top two devices has and lacks the richness in GUI options.
On the plus side it is small allowing space for extra buttons and uses a minimal number of pins. Also not being a shield allows me to hook this up onto a proto-board along with a relay and the thermistor reducing the stacking of components and making my device slimmer. I could get away with just three boards, the Uno, the Ethernet and the Proto.

LCD screen
What I will loose in visual polish I will make up for size. This seems like a fair trade off.
Having played around with the screen I think I can make this work and will use it for the Ethernet thermostat.
This just leaves me with designing a proto-board that contains the screen and other components. For $16 I can get a Makershield from Makeshed and solder my devices to it easily.
So all-in-all this seems like the best path forward.
Conclusion
The LCD device while not the best looking will do the job. My next post on the Ethernet thermostat will look at starting the construction process and review all the components necessary. I’ll also be showing some experimentations I have done with a relay shield and mains power.
The past few weeks have seen some experimenting with the Arduino-to-Raspberry Pi shield so expect a post on that soon, as a heads up it is very cool!

Does the LCD have any light on it?
If it’s final resting place is in a poorly lit position, you’ll probably end up needed to have a torch with you to be able to read it. (That my experience with my current heating controls.)
LikeLike
Hi,
yeah sorry I realized I have linked to the wrong page on Makeshed.
The specs for the LCD screen are:
LCD alphanumeric display screen, 16×2 (1)—Has 2 lines of 16 characters, in blue pixels over a yellow-green LED backlight, and measures 80mm×36mm×15.8mm.
The thermostat is going to be sitting in a well lit room that has lights, so the backlight wasn’t a big concern.
LikeLike